Yarn: Rowan Felted Tweed (you won’t need very much so it’s great for using up odd bits of stash)
Needle: 3.75mm or whatever you need to get gauge
Gauge: 22st per 4″ x 32 rows per 4″ (though row gauge is less important to be honest)
Size: Newborn to 5 months? (I’ll know better in a few months time when no2 arrives. 🙂
Important Measurements (useful for if you’re planning to knit it in a different weight, or if you can’t get gauge):
Cast on length = 13 1/2″
Height of main body of the bonnet = 5″
Length of each section when you start the back of the bonnet (and start gobbling up the side stitches) = Slightly more than 1/3, slightly less than 1/3, slightly more than a 1/3 (same number as the first section.)
Length of the middle back at the bottom (after your decreases along the length of the bottom): 3″
(I hope that all makes sense.)

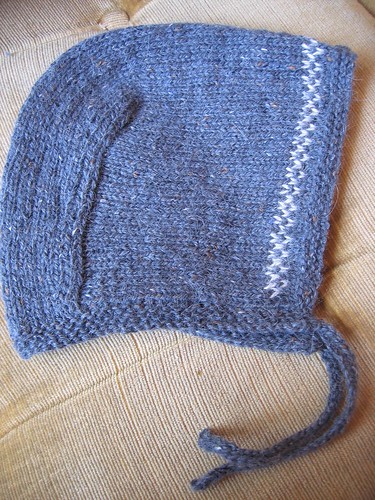
(Tiny hat on a big noggin. 🙂
Pattern:
Cast on 74st and knit in garter stitch until you have 3 bump rows.
Continue in st st until the piece measures 5″ in length from cast on. (Obviously you can add any pattern embelishments that you like in this section. You could even add a steek and do some colour work – you would cut the steek at the end and then add the lower garter band on – I will hopefully try this very soon.)
End the main section at the end of a purl row.
K 27st then place marker. K 20 then place another marker. SSK then turn work and slip the stitch you just knit. Continue purling back along the row till you get to the stitch after the marker. P2tog then turn work again, and slip the stitch you just purled together. This has completed one pair of rows.
Repeat back and forth, SSK or P2tog the stitches after each marker. You are gobbling up a stitch either side of the middle section every two rows, creating a neat 90 degree turn that will be the back of the bonnet.
On the 8th, 16th and 24th pair of rows decrease two stitches from the middle section. (You can count the larger stitches where the side stitches meet the back section to keep track of how many pairs of rows you have done – since there is one larger stitch at either side for each pair of rows.)
(I decreased a stitch just before the side stitch at either side, by k2tog on the right side, and PSSK on the wrong side, but whatever works for you.)
Carry on till all the side stitches are gobbled up. Break yarn but keep the live stitches on the needle.
With the right side facing you, pick up and knit stitches along the bottom of the hat. You will knit the live stitches as you come to them. K 1 stitch per garter stitch bump, then 1 stitch every 2 st st rows (21 stitches approx. till you get to the live stitches at the middle), K all the live stitches, then carry on with 1 stitch every 2 st st rows, and finally 1 stitch every garter stitch bump at the other end. (60st in total – approx.)
In garter stitch, knit till you have 3 garter stitch bump rows on the wrong side, then cast off. This will make the third garter stitch bump on the right side. Don’t pull the yarn through the final stitch.
Instead pick up and knit two additional stitches above the final stitch and use them as the basis for an I-cord tie. Knit the I-cord to about 6″ in length (or whatever length you prefer.)
Pick up three stitches at the opposite edge of the bonnet and make a second I-cord tie.
Weave in all your ends and block.
Then go for a walk with your newly warm-headed baby. 🙂
Very cute – the boys in my office are having babies at the moment so I might give it a whirl instead of booties!
This is my go to bonnet for babies. Love the versatility in the pattern.
Yay! I’m really glad you find it useful!