(You can read the first post about me dipping my toe into the world of Waldorf Dolls here.)
So last time I posted, the doll looked like this:
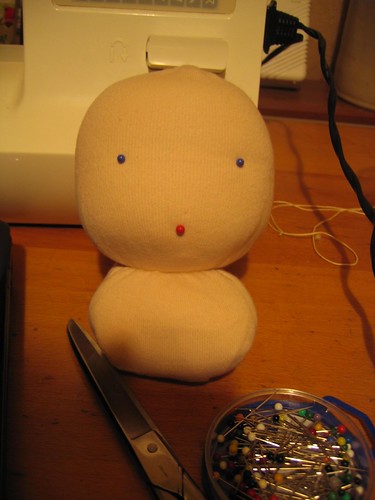
a day or so later (after looking at a lot of other dolls, and working out what I liked and disliked) I sat down and sewed the facial features.

I have to say, it was well worth buying a doll making needle. I did a lot of swapping between that and a decent embroidery needle, depending if I was working through the head, or on the top layer of fabric.
I started and ended at the back of the head, which allowed me to pull both ends of the threads and tie them together (this will be hidden by the hair, and won’t be accessible at all), which helped the eyes sink into the head a bit.
I did the same with the mouth but didn’t pull as tight. The threads are just normal 6ply embroidery threads, spilt into 3 threads for the eyes and 4 for the mouth (I think.)
Next up, I cut out all the body and limb pieces and set about making the body.
Once that body had come together I tucked the shoulders into the body and sewed the neck to the top edge of the body.

You could make really labour intensive skittles this way! 🙂
Getting the stitches neat led to a lot of turning the body upside-down to pick up the sewing stitch on one side and turning it the right way round again to pick up the stitch on the otherside.
However it was worth taking the time, since I ended up with a neat neck edge.

The limbs were fiddlier to sew, but really it’s just a case of taking your time.
Once they were all sewn and stuffed I set about sewing the limbs onto the body. FB is going to be two, so I was working on a jointed doll. Even though I was a bit intimidating, it turned out to be fine.
Again it would have been much harder to do without the doll making needle but it turned out that sewing the eyes and sewing the limbs on was a very similar process.
Basically you send a length of crochet cotton through the arm, and the body and out the other arm, they you repeat the process again but about 1cm lower that the first thread. Then you do the same thing again very close to each of those two threads – so you have two pairs of threads – an upper pair and a lower pair. You knot these four threads together at one side, and then you pull the other four threads tight on the other side, so that the arms pull in tight to the body (this sets them into the body and makes the shoulders), and thenn knot those four threads together.
I then took each end of thread separately and finished them off so that the ends were inside the limb, and both arm joints looked really neat.
I did exactly the same with the legs, although I ended up repositioning the legs because the first time I set them too high and the doll didn’t sit down well. But repositioning was pretty easy – I just carefully snipped one of the knots, trying not to damage the leg fabric as I went.
And I ended up with this:

He’s very huggable and it’s very hard to put him back into the drawer when I’m done sewing for the day.
Next time I’ll show you the hair I made.